Televisions are designed to handle diverse input and signal types, adapting the processing and display of these signals on the screen. However, there’s a common problem known as overscan that can lead to a portion of the TV screen being cut off. I experienced this for the first time when I plugged in my PS5
Thankfully, most TVs come with automatic adjustment features that resize the input image to fit the screen. But some models may not handle it perfectly, resulting in the trimming of a small portion of the image (usually around 2-5%) and stretching the rest to fill the screen.
To address this picture cut-off issue, I’ve found that optimizing the aspect ratio settings on your TV can make a significant difference. By making a few adjustments, you can ensure that the entire picture is displayed correctly on the screen, without any parts being cropped or distorted.
It’s important to note that the solutions for overscan can vary depending on your TV model. If the tips I share here don’t work for you or if you can’t find the specific settings in your TV menu, I would recommend referring to your TV’s documentation or reaching out to the manufacturer for further assistance.
TV Display Options
In today’s broadcasting landscape, most TV content is transmitted in widescreen format (16:9), which newer TVs are designed to display flawlessly. However, if you have an older TV with a 4:3 aspect ratio, it may require some adjustments to ensure optimal viewing.
To tackle this, you can utilize the aspect ratio adjustment feature called Freeview. I suggest referring to your TV’s user guide for instructions on how to access and use this feature. It will allow you to fine-tune the aspect ratio on your receiver and obtain the best possible picture quality on your specific TV model.
Two common 4:3 display options you can explore are “Center Cut” or “Pan Scan” and “Letterbox.” With the Center Cut or Pan Scan option, the image fills the entire screen, eliminating any black bars.
However, it’s worth noting that you may lose some graphic details and parts of widescreen videos. On the other hand, the Letterbox option gives you the complete widescreen picture without cropping. When viewing old 4:3 content, you’ll see black bars at the top and bottom, similar to DVD viewing.
Best Solutions for TV Screen Cutting Off
There are some effective fixes for the TV Screen cut-off issue. Let’s explore them:
Turn Off Overscan
Some older TVs have an “Overscan” option that affects the display of the screen. Overscan is a feature that allows the TV to zoom in slightly on the image being displayed, which can cause a portion of the picture to be cut off. This feature was commonly used in older TVs to compensate for the variations in the size and position of video signals.
To see if your TV has an Overscan option and turn it off, follow these steps:
- Access the TV’s menu: Use the remote control to navigate to the settings or menu screen of your TV. The exact location of the menu may vary depending on the brand and model of your TV.
- Look for display or picture settings: Within the TV’s menu, locate the display or picture settings. These settings control various aspects of the TV’s display, including overscan.
- Find the Overscan option: Look for an option specifically labeled as “Overscan” or “Screen Fit.” It might also be under a different name, such as “Picture Size” or “Aspect Ratio.” Check the available options within this setting.
- Disable the Overscan option: If you find the Overscan option, select it and turn it off. This will disable the zooming effect and ensure that the entire picture fits within the screen without being cut off.
- Save the changes: After disabling the Overscan option, save the changes and exit the menu. The TV should now display the full picture without any cutoff.
Use Your NVIDIA or any Graphics Management Software
To ensure that the entire screen is displayed on your computer, you can adjust the “Display Scaling” setting in your graphics management software. The location of this setting may vary depending on the type of graphics processing unit (GPU) you have installed on your computer.
If you have an Intel GPU, you can access the Intel HD Control Panel. For AMD GPUs, you can use the AMD Radeon Settings, and for Nvidia GPUs, you can access the Nvidia GeForce Settings.
I personally use an NVIDIA and find the display features under ‘Settings’ at the lower bottom of the right side of my TV Screen. You have to select the ‘custom’ option to make any changes.

Here’s how to adjust the display scaling setting:
- Identify your GPU: Determine the type of GPU you have installed on your computer. You can usually find this information in the system specifications or by checking the manufacturer’s documentation.
- Open the graphics management software: Depending on your GPU, open the corresponding software. This can usually be done by right-clicking on the desktop and selecting the software from the context menu or by searching for it in the Start menu.
- Find the “Display Scaling” setting: Once in the graphics management software, look for a setting called “Display Scaling.” This setting may be located in different sections or tabs depending on the software.
- Adjust the display scaling: Once you have located the “Display Scaling” setting, adjust it to ensure the whole screen is displayed. Typically, you’ll want to select an option like “Maintain Aspect Ratio” or “No Scaling” to prevent any cropping or cutoff of the screen.
- Save the changes: After adjusting the display scaling setting, save the changes and exit the graphics management software.
Keep in mind that the exact steps and terminology may vary depending on the version of the graphics management software and the specific GPU model you have. If you have an AMD GPU, the setting may be buried under an “Additional Settings” section.
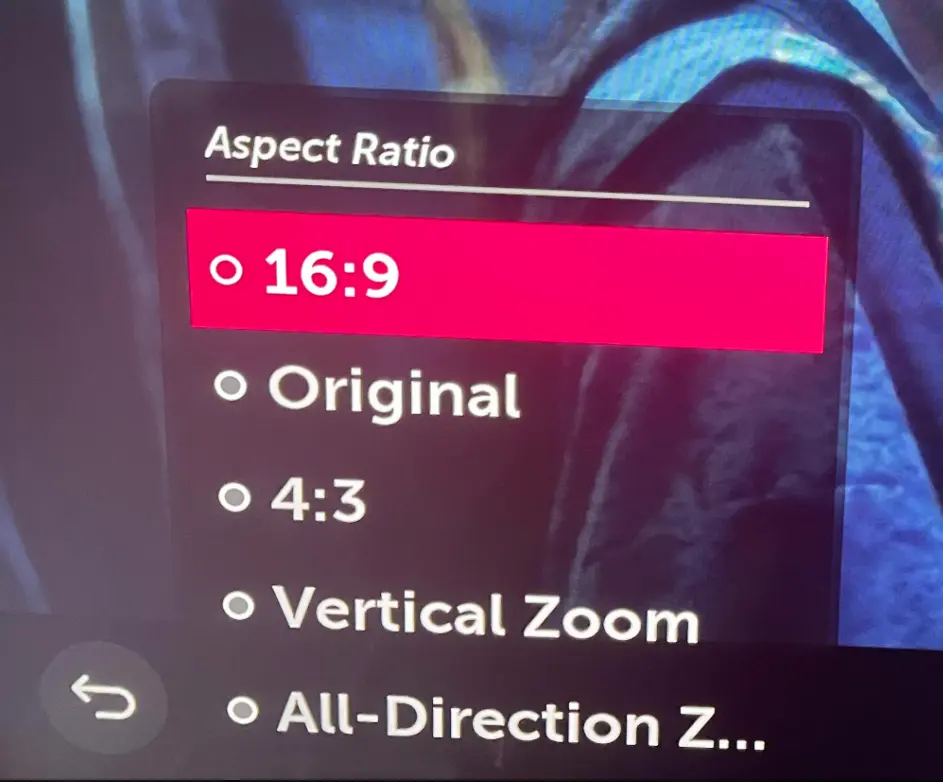
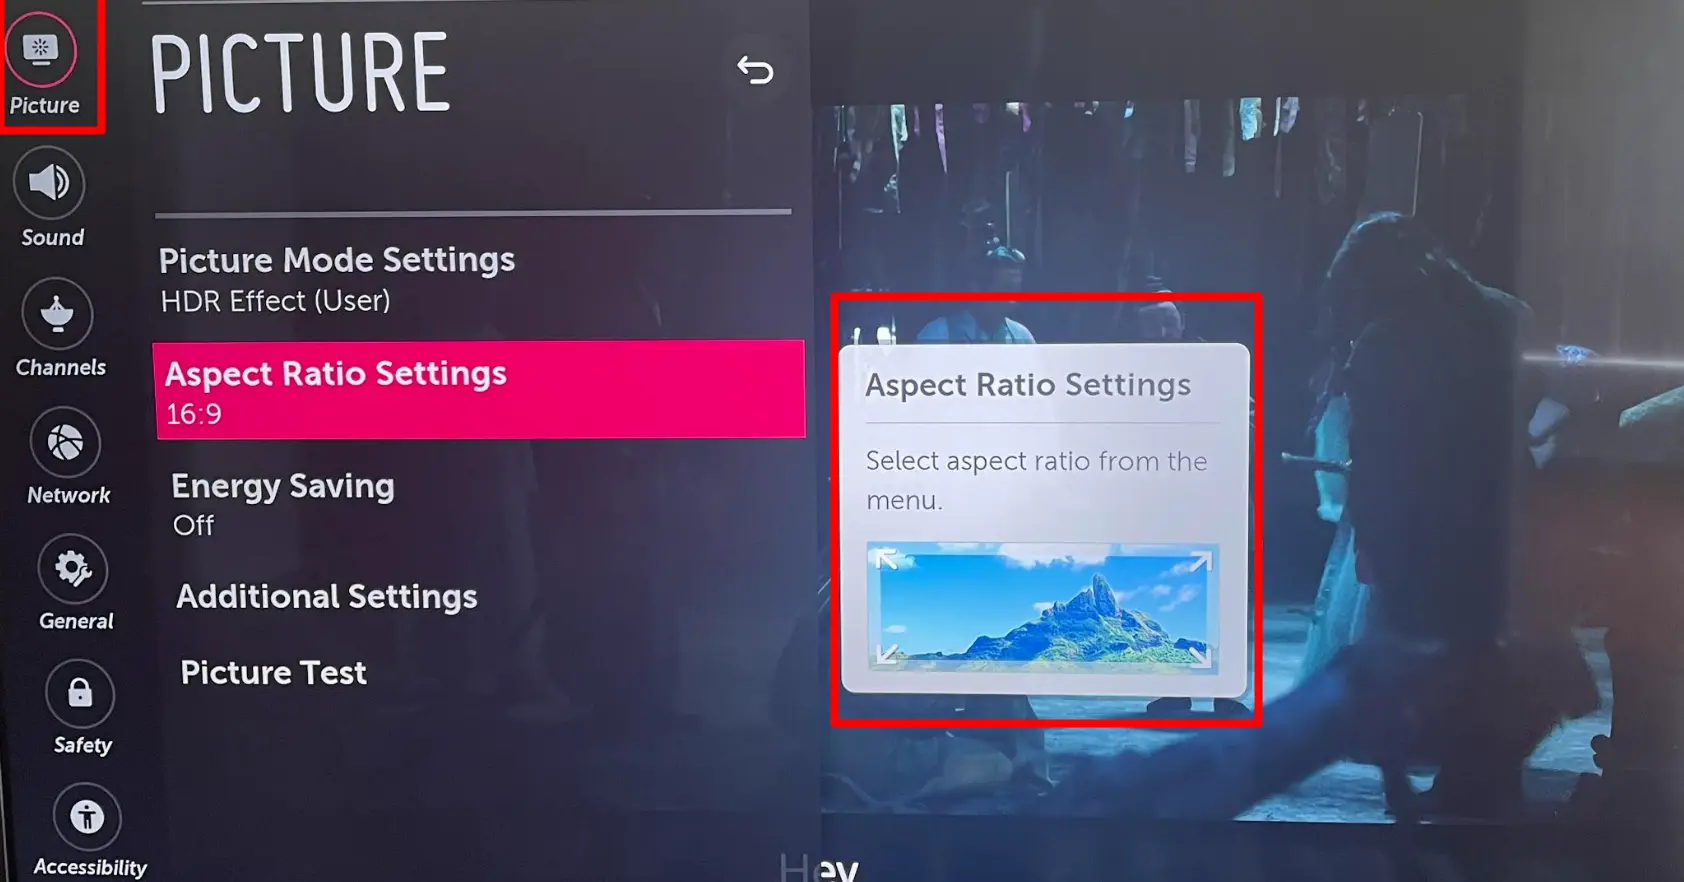
Adjust the Television Aspect Ratio Settings
Access your TV’s menu or use the remote control to navigate to the screen features. Look for options like “Picture” or “Input” settings. Refer to your TV’s manual for specific instructions.
Find the setting that allows you to change the aspect ratio to “Normal” or adjust it to a suitable widescreen or zoom setting. Depending on your settings, you can either change the aspect ratio to either full, auto or 16:9 (basically play around the settings to find what works for your TV model). Some TVs also have a vertical setting that can change the image’s position on the screen.
I own an LG TV and found the option under “Just Scan”. Turn the setting on if it isn’t already.
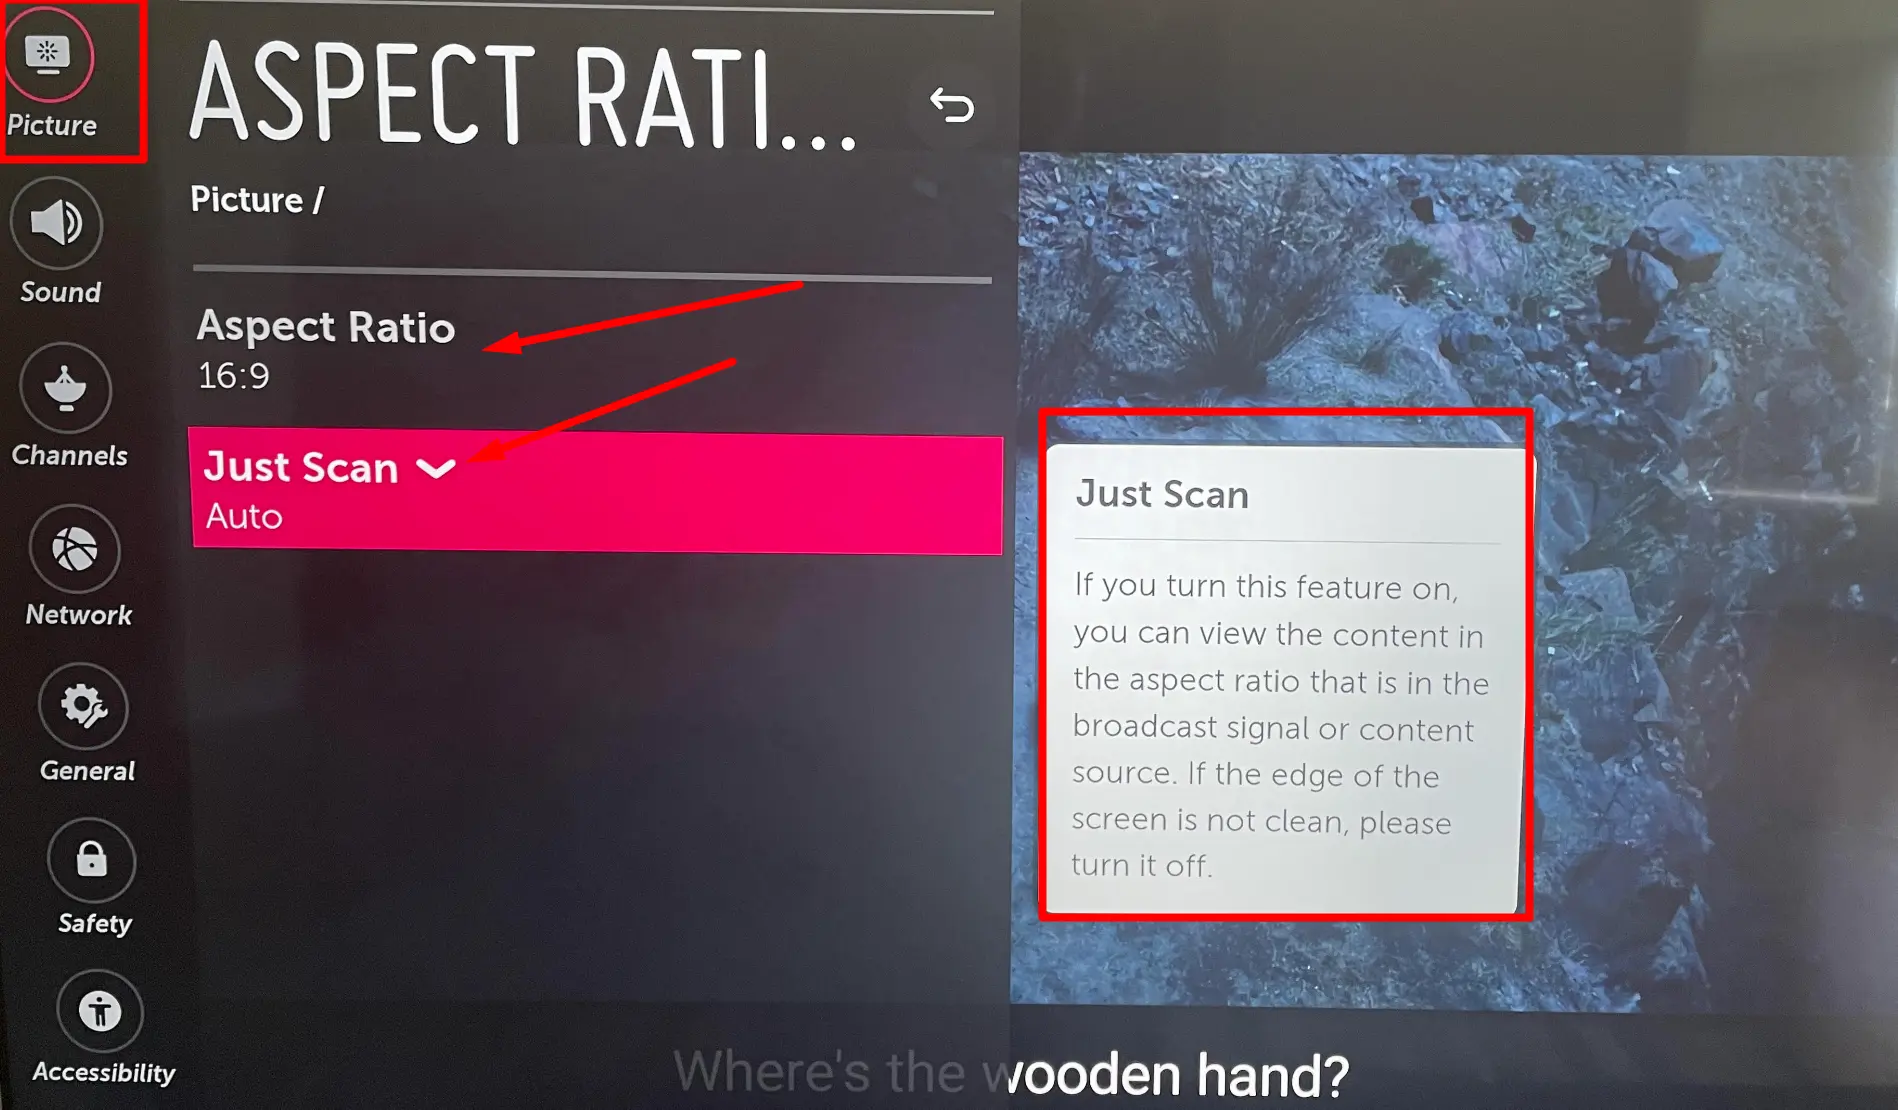
All settings -> Picture -> Aspect Ratio -> Just Scan On (Auto doesn’t work)
Check Satellite or Cable Settings
Cable and satellite receivers, DVD players, and other external devices can also impact the screen display. Ensure that the settings on these devices are properly configured to match the resolution and aspect ratio of your TV.
Test Other Channels
Check different channels to determine if the screen cutting off issue persists across all channels or is specific to one. Sometimes, the problem may be with the broadcast rather than your TV. Also, note that certain channels may display black bars in normal mode due to varying broadcast formats.
Utilize a Universal Remote Control
Using a universal remote control can simplify screen adjustments across multiple devices connected to your TV. Program the remote to control your TV, cable/satellite box, DVR, and audio system. Make sure to select a universal remote that supports the necessary features for adjusting aspect ratios.
Verify Cable Connections
If you have an HDTV and an HD receiver, it’s crucial to connect them using an HDMI cable. Standard definition cables like RCA or coaxial may distort the TV picture’s shape and quality. Ensure all cables are securely connected and of high quality to avoid any signal degradation.
Address Backlight Issues
If you notice a half picture display or a bluish hue, it might indicate a more serious problem with the TV’s panel or backlight. In such cases, it’s advisable to seek professional repair services to replace the faulty components.